Object Counting (Over Time)
Overview
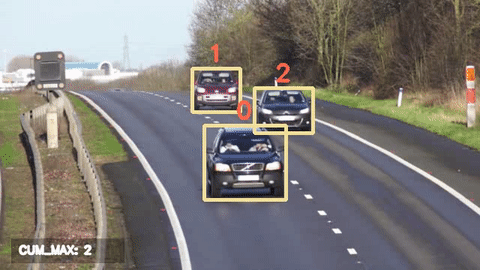
Object counting over time involves detecting and tracking unique objects, and incrementing the count when new objects appear. When applied to the vehicles in the GIF below, it can count the total number of vehicles passing by over a period of time, aiding transportation planning by identifying periods of peak traffic. This use case is not limited to just vehicles, as up to 80 types of objects can be monitored (including animals), giving rise to a wide breadth of potential applications.
See also
While it is also possible to count people over time with this use case, more accurate results can be obtained by using the People Counting (Over Time) use case.
See also
If you wish to only count the number objects at an instance rather than a cumulative total over a period of time, the simpler Object Counting (Present) use case without requiring object tracking would be more suitable.
Object counting over time is achieved by detecting the objects using an object detection model, then tracking each unique object. As a new object appears, the number of counted objects is incremented. This is explained in the How It Works section.
Demo
To try our solution on your own computer, install and run PeekingDuck with the configuration file object_counting_over_time.yml as shown:
Terminal Session
How It Works
Object counting over time comprises three main components:
Object detection,
Tracking the outputs of object detection, and
Incrementing the count.
1. Object Detection
The EfficientDet model is used here to predict the bounding boxes of objects of interest. This allows the application to identify where each object is located within the video feed. The location is returned as a pair of x, y coordinates in the form \([x_1, y_1, x_2, y_2]\), where \((x_1, y_1)\) is the top-left corner of the bounding box, and \((x_2, y_2)\) is the bottom right.

2. Tracking the Outputs of Object Detection
An Intersection over Union (IoU) tracker adapted from this paper is used on the bounding boxes from the object detection model to produce tracked identities (IDs) for each bounding box. The IoU tracker continues a track by associating the detection with the highest IoU to the last detection in the previous frame. For example, Car 8 in frame n continues to be tracked as Car 8 in frame n+1 as both instances of Car 8 are within close proximity (high IoU) of each other. This assumes that the object detector correctly predicts a bounding box per frame for each object to be tracked, and also assumes that the frame rate of the video is high enough to allow unambigious IoU overlaps between consecutive frames.
Another available option is the Minimum Output Sum of Squared Error (MOSSE) tracker which we have adapted from the OpenCV package. It is a correlation filter based tracker which uses Fast Fourier Transform (FFT) to perform operations in the frequency domain, reducing computational complexity. More details can be found from this paper.
3. Incrementing the Count
Monotonically increasing integer IDs beginning from 0 are assigned to new unique objects. For example, the first tracked object is assigned an ID of 0, the second tracked object is assigned an ID of 1, and so on. Thus the total number of unique objects that have appeared in the entire duration is simply the cumulative maximum.
Nodes Used
These are the nodes used in the earlier demo (also in object_counting_over_time.yml):
nodes:
- input.visual:
    source: <path/to/video with cars>
- model.efficientdet:
    detect: ["car"]
- dabble.tracking:
    tracking_type: "iou"
- dabble.statistics:
    maximum: obj_attrs["ids"]
- draw.bbox
- draw.tag:
    show: ["ids"]
- draw.legend:
    show: ["cum_max"]
- output.screen
1. Object Detection Node
In the demo, the model.efficientdet node is used for object detection, set to detect cars.
As mentioned in the earlier How It Works section, for object tracking to work well, the upstream
object detector needs to produce predictions which are as accurate as possible. Please
take a look at the benchmarks of object detection models
that are included in PeekingDuck if you would like to use a different model or model type better
suited to your use case.
2. Tracking Node
The dabble.tracking node used here is not an AI model but uses heuristics, hence it falls
under the category of dabble nodes instead of model nodes. It needs to be paired with an
upstream object detector node, but this also gives it a key advantage - it can track any of the
80 types of detectable objects. In contrast,
the People Counting (Over Time) use case uses a single
model node purpose-built for both human detection and tracking, giving it more accuracy but limiting
its usage to only humans.
3. Statistics Node
The dabble.statistics node retrieves the maximum detected ID for each frame. If the ID
exceeds the previous maximum, the cum_max (cumulative maximum) is updated. As monotonically
increasing integer IDs beginning from 0 are assigned to new unique objects, the maximum ID is
equal to the total number of unique objects over time.
4. Adjusting Nodes
Some common node behaviors that you might need to adjust are:
For model.efficientdet:
model_type:0,1,2,3, or4. The larger the number, the higher the accuracy, at the cost of inference speed.detect: Object class IDs to be detected. Refer to Object Detection IDs table for the class IDs for each model.
For dabble.tracking:
tracking_type: Choose either["iou", "mosse"], described earlier in the How It Works section.
For more adjustable node behaviors not listed here, check out the API Documentation.
Counting Objects Within Zones
It is possible to extend this use case with the Zone Counting use case. For example, if the road were a dual carriageway and we are only interested counting the vehicles on one side of the road, we could split the video into 2 different zones and only count the vehicles within the chosen zone. An example of how this can be done is given in the Tracking People within a Zone tutorial.