This section will demonstrate how to change the settings of PeekingDuck’s nodes
to vary their functionalities.
If you had completed the earlier object detection
tutorial, you will have the necessary folder and can skip to
the next step.
Otherwise, create a new PeekingDuck project as shown below:
Terminal Session
[~user] > mkdir object_detection
[~user] > cd object_detection
[~user/object_detection] > peekingduck init
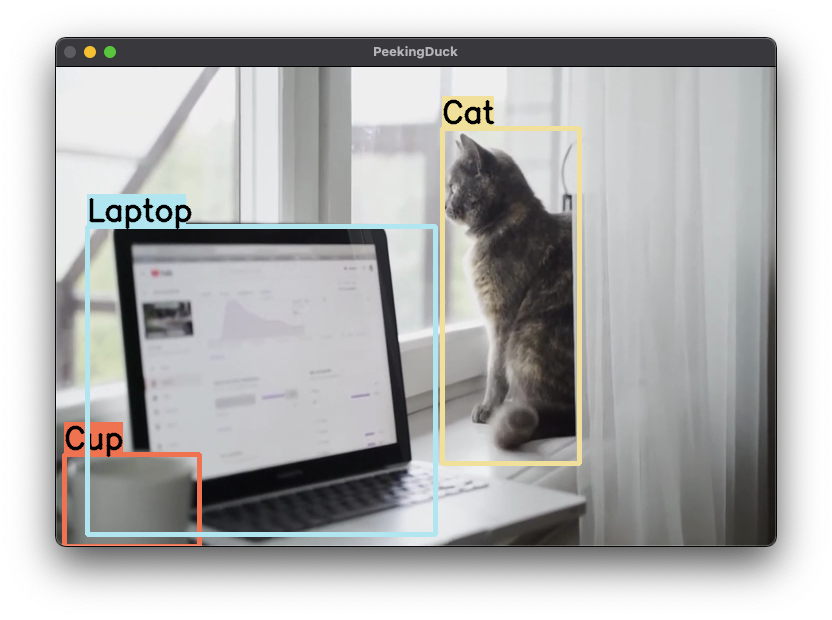
Next, download this demo video cat_and_computer.mp4 and
save it into the object_detection folder.
You should see a display of the cat_and_computer.mp4 with the various objects being
highlighted by PeekingDuck in bounding boxes.
The 30-second video will auto-close at the end, or you can press q to end early.
Note
The YOLO model can detect 80 different object classes. By default, it only detects the "person" class. Use
detect:["*"] in the pipeline_config.yml to configure the model to detect all 80
classes.
This section demonstrates how to record PeekingDuck’s output into a video file.
In addition, we will modify the pipeline by adding new nodes to calculate the
frames per second (FPS) and to show the FPS.
Edit pipeline_config.yml as shown below:
1nodes: 2-input.visual: 3source:cat_and_computer.mp4 4-model.yolo: 5detect:["cup","cat","laptop","keyboard","mouse"] 6-draw.bbox: 7show_labels:True 8-dabble.fps# add new dabble node 9-draw.legend:# show fps10show:["fps"]11-output.screen12-output.media_writer:# add new output node13output_dir:/folder/to/save/video# this is a folder name
The additions are:
Line 8 dabble.fps: adds new dabble node to the pipeline. This node calculates the FPS.
Line 12 output.media_writer: adds new output node to save PeekingDuck’s
output to a local video file. It requires a local folder path. If the folder
is not available, PeekingDuck will create the folder automatically. The
filename is auto-generated by PeekingDuck based on the input source.
Run the above with the command peekingduck run.
You will see the same video being played, but now it has the FPS counter.
When the video ends, an mp4 video file will be created and saved in the
specified folder.
Note
You can view all the available nodes and their respective configurable
settings in PeekingDuck’s API documentation.
Here is an explanation on what goes on behind the scenes when you configure a node.
Every node has a set of default configuration.
For instance, draw.bbox default configuration is:
The keys input and output are compulsory and common across every node.
input specifies the data types the node would consume, to be read from the pipeline.
output specifies the data types the node would produce, to be put into the pipeline.
By default, show_labels is disabled.
When you enable it with show_labels:True, what PeekingDuck does is to override
the default show_labels:False configuration with your specified True value.
You will see another instance of this at work in the advanced Peaking Duck tutorial on
Tracking People Within a Zone.
PeekingDuck has a class of augment nodes that can be used to perform preprocessing
or postprocessing of images/videos.
Augment currently lets you modify the brightness and contrast, and remove distortion from a wide-angle camera
image. For more details on image undistortion, refer to the documentation on augment.undistort and
dabble.camera_calibration.
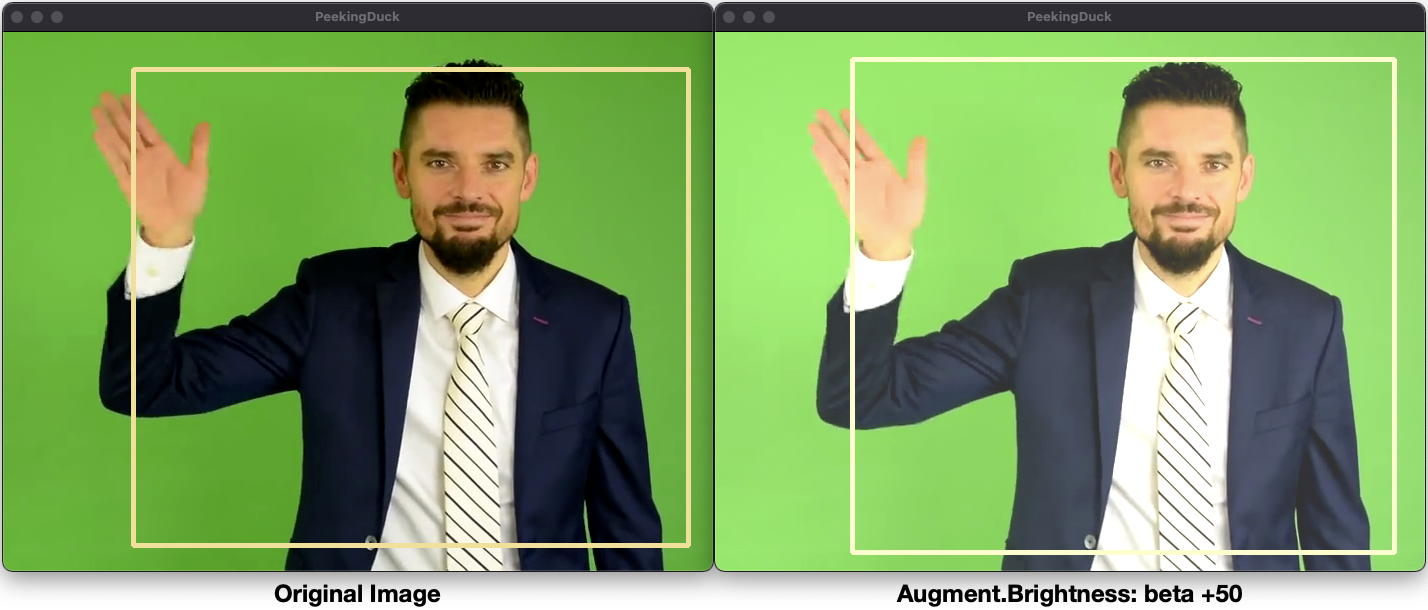
The pipeline_config.yml below shows how to use the augment.brightness node
within the pipeline:
1nodes:2-input.visual:3source:https://storage.googleapis.com/peekingduck/videos/wave.mp44-model.yolo5-augment.brightness:6beta:50# ranges from -100 (darken) to +100 (brighten)7-draw.bbox8-output.screen
The following figure shows the difference between the original vs the brightened image: