This tutorial will show you how to create your own custom nodes to run with
PeekingDuck.
Perhaps you’d like to take a snapshot of a video frame, and post it to your API
endpoint;
or perhaps you have a model trained on a custom dataset, and would like to use
PeekingDuck’s input, draw, and output nodes.
PeekingDuck is designed to be very flexible — you can create your own nodes
and use them with ours.
Let’s start by creating a new PeekingDuck project:
Terminal Session
[~user] > mkdir custom_project
[~user] > cd custom_project
[~user/custom_project] > peekingduck init
This creates the following custom_project folder structure:
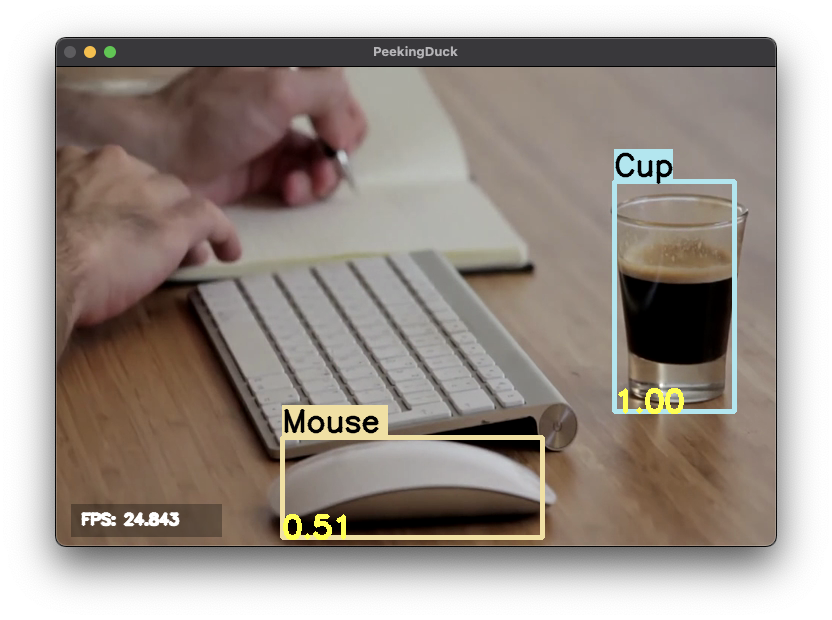
When the YOLO object detection model detects an object in the image, it assigns
a bounding box and a score to it.
This score is the “confidence score” which reflects how likely the box contains
an object and how accurate is the bounding box.
It is a decimal number that ranges from 0.0 to 1.0 (or 100%).
This number is internal and not readily viewable.
We will create a custom node to retrieve this score and display it on screen.
This tutorial will use the cat_and_computer.mp4 video from
the earlier object detection tutorial.
Copy it into the custom_project folder.
Use the following command to create a custom node: peekingduck create-node
It will prompt you to answer several questions.
Press <Enter> to accept the default custom_nodes folder name, then key
in draw for node type and score for node name.
Finally, press <Enter> to answer Y when asked to proceed.
The entire interaction is shown here, the answers you type in are shown in
green text:
Terminal Session
[~user/custom_project] > peekingduck create-node
Creating new custom node…
Enter node directory relative to ~user/custom_project [src/custom_nodes]: ⏎
Select node type (input, augment, model, draw, dabble, output): draw
custom_project now contains three files that we need to modify to
implement our custom node function.
src/custom_nodes/configs/draw/score.yml:
score.yml initial content:
1# Mandatory configs 2# Receive bounding boxes and their respective labels as input. Replace with 3# other data types as required. List of built-in data types for PeekingDuck can 4# be found at https://peekingduck.readthedocs.io/en/stable/glossary.html. 5input:["bboxes","bbox_labels"] 6# Example: 7# Output `obj_attrs` for visualization with `draw.tag` node and `custom_key` for 8# use with other custom nodes. Replace as required. 9output:["obj_attrs","custom_key"]1011# Optional configs depending on node12threshold:0.5# example
The first file score.yml defines the properties of the custom node.
Lines 5 and 9 show the mandatory configs input and output.
input specifies the data types the node would consume, to be read from the pipeline. output specifies the data types the node would produce, to be put into the pipeline.
To display the bounding box confidence score, our node requires three pieces of input
data: the bounding box, the score to display, and the image to draw on. These are
defined as the data types bboxes, bbox_scores, and img
respectively in the API docs.
Our custom node only displays the score on screen and does not produce any
outputs for the pipeline, so the output is “none”.
There are also no optional configs, so lines 11 - 12 can be removed.
score.yml updated content:
1# Mandatory configs2input:["img","bboxes","bbox_scores"]3output:["none"]45# No optional configs
Note
Comments in yaml files start with #
It is possible for a node to have input:["none"]
src/custom_nodes/draw/score.py:
The second file score.py contains the boilerplate code for creating a
custom node. Update the code to implement the desired behavior for the node.
Show/Hide Code for score.py
1""" 2Custom node to show object detection scores 3""" 4 5fromtypingimportAny,Dict,List,Tuple 6importcv2 7frompeekingduck.pipeline.nodes.abstract_nodeimportAbstractNode 8 9YELLOW=(0,255,255)# in BGR format, per opencv's convention101112defmap_bbox_to_image_coords(13bbox:List[float],image_size:Tuple[int,int]14)->List[int]:15"""This is a helper function to map bounding box coords (relative) to16 image coords (absolute).17 Bounding box coords ranges from 0 to 118 where (0, 0) = image top-left, (1, 1) = image bottom-right.1920 Args:21 bbox (List[float]): List of 4 floats x1, y1, x2, y222 image_size (Tuple[int, int]): Width, Height of image2324 Returns:25 List[int]: x1, y1, x2, y2 in integer image coords26 """27width,height=image_size[0],image_size[1]28x1,y1,x2,y2=bbox29x1*=width30x2*=width31y1*=height32y2*=height33returnint(x1),int(y1),int(x2),int(y2)343536classNode(AbstractNode):37"""This is a template class of how to write a node for PeekingDuck,38 using AbstractNode as the parent class.39 This node draws scores on objects detected.4041 Args:42 config (:obj:`Dict[str, Any]` | :obj:`None`): Node configuration.43 """4445def__init__(self,config:Dict[str,Any]=None,**kwargs:Any)->None:46"""Node initializer4748 Since we do not require any special setup, it only calls the __init__49 method of its parent class.50 """51super().__init__(config,node_path=__name__,**kwargs)5253defrun(self,inputs:Dict[str,Any])->Dict[str,Any]:# type: ignore54"""This method implements the display score function.55 As PeekingDuck iterates through the CV pipeline, this 'run' method56 is called at each iteration.5758 Args:59 inputs (dict): Dictionary with keys "img", "bboxes", "bbox_scores"6061 Returns:62 outputs (dict): Empty dictionary63 """6465# extract pipeline inputs and compute image size in (width, height)66img=inputs["img"]67bboxes=inputs["bboxes"]68scores=inputs["bbox_scores"]69img_size=(img.shape[1],img.shape[0])# width, height7071fori,bboxinenumerate(bboxes):72# for each bounding box:73# - compute (x1, y1) top-left, (x2, y2) bottom-right coordinates74# - convert score into a two decimal place numeric string75# - draw score string onto image using opencv's putText()76# (see opencv's API docs for more info)77x1,y1,x2,y2=map_bbox_to_image_coords(bbox,img_size)78score=scores[i]79score_str=f"{score:0.2f}"80cv2.putText(81img=img,82text=score_str,83org=(x1,y2),84fontFace=cv2.FONT_HERSHEY_SIMPLEX,85fontScale=1.0,86color=YELLOW,87thickness=3,88)8990return{}# node has no outputs
The updated node code defines a helper function map_bbox_to_image_coords to map
the bounding box coordinates to the image coordinates, as explained in this
section.
The run method implements the main logic which processes every bounding box to
compute its on-screen coordinates and to draw the bounding box confidence score at
its left-bottom position.
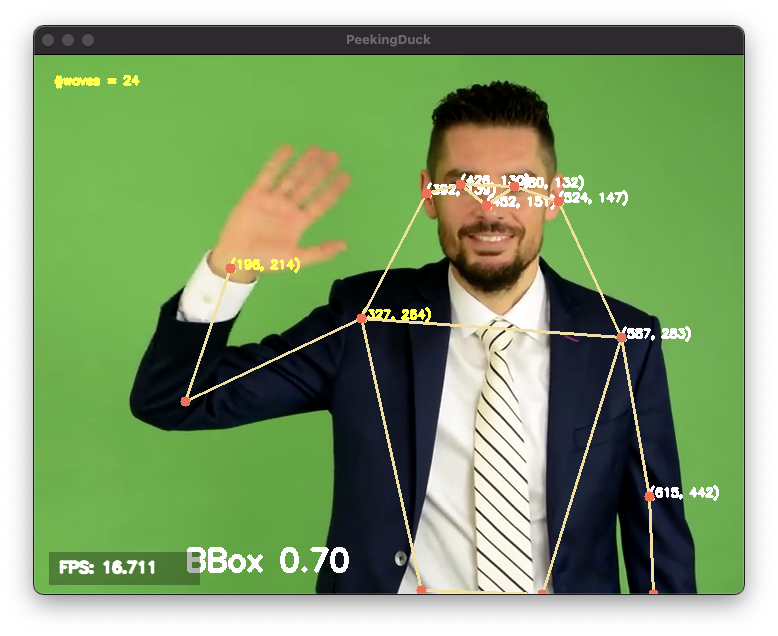
This tutorial will create a custom node to analyze the skeletal keypoints of the
person from the wave.mp4
video in the pose estimation tutorial and to
count the number of times the person waves his hand.
The PoseNet pose estimation model outputs seventeen keypoints for the person
corresponding to the different body parts as documented here.
Each keypoint is a pair of (x,y) coordinates, where x and y are
real numbers ranging from 0.0 to 1.0 (using
relative coordinates).
Starting with a newly initialized PeekingDuck folder, call peekingduck
create-node to create a new dabble.wave custom node as shown below:
Terminal Session
[~user] > mkdir wave_project
[~user] > cd wave_project
[~user/wave_project] > peekingduck init
Welcome to PeekingDuck!
2022-02-11 18:17:31 peekingduck.cli INFO: Creating custom nodes folder in ~user/wave_project/src/custom_nodes
[~user/wave_project] > peekingduck create-node
Creating new custom node…
Enter node directory relative to ~user/wave_project [src/custom_nodes]: ⏎
Select node type (input, augment, model, draw, dabble, output): dabble
The dabble.wave code structure is similar to the draw.score code structure in
the other custom node tutorial.
Show/Hide Code for wave.py
1""" 2Custom node to show keypoints and count the number of times the person's hand is waved 3""" 4 5fromtypingimportAny,Dict,List,Tuple 6importcv2 7frompeekingduck.pipeline.nodes.abstract_nodeimportAbstractNode 8 9# setup global constants 10FONT=cv2.FONT_HERSHEY_SIMPLEX 11WHITE=(255,255,255)# opencv loads file in BGR format 12YELLOW=(0,255,255) 13THRESHOLD=0.6# ignore keypoints below this threshold 14KP_RIGHT_SHOULDER=6# PoseNet's skeletal keypoints 15KP_RIGHT_WRIST=10 16 17 18defmap_bbox_to_image_coords( 19bbox:List[float],image_size:Tuple[int,int] 20)->List[int]: 21"""First helper function to convert relative bounding box coordinates to 22 absolute image coordinates. 23 Bounding box coords ranges from 0 to 1 24 where (0, 0) = image top-left, (1, 1) = image bottom-right. 25 26 Args: 27 bbox (List[float]): List of 4 floats x1, y1, x2, y2 28 image_size (Tuple[int, int]): Width, Height of image 29 30 Returns: 31 List[int]: x1, y1, x2, y2 in integer image coords 32 """ 33width,height=image_size[0],image_size[1] 34x1,y1,x2,y2=bbox 35x1*=width 36x2*=width 37y1*=height 38y2*=height 39returnint(x1),int(y1),int(x2),int(y2) 40 41 42defmap_keypoint_to_image_coords( 43keypoint:List[float],image_size:Tuple[int,int] 44)->List[int]: 45"""Second helper function to convert relative keypoint coordinates to 46 absolute image coordinates. 47 Keypoint coords ranges from 0 to 1 48 where (0, 0) = image top-left, (1, 1) = image bottom-right. 49 50 Args: 51 bbox (List[float]): List of 2 floats x, y (relative) 52 image_size (Tuple[int, int]): Width, Height of image 53 54 Returns: 55 List[int]: x, y in integer image coords 56 """ 57width,height=image_size[0],image_size[1] 58x,y=keypoint 59x*=width 60y*=height 61returnint(x),int(y) 62 63 64defdraw_text(img,x,y,text_str:str,color_code): 65"""Helper function to call opencv's drawing function, 66 to improve code readability in node's run() method. 67 """ 68cv2.putText( 69img=img, 70text=text_str, 71org=(x,y), 72fontFace=cv2.FONT_HERSHEY_SIMPLEX, 73fontScale=0.4, 74color=color_code, 75thickness=2, 76) 77 78 79classNode(AbstractNode): 80"""Custom node to display keypoints and count number of hand waves 81 82 Args: 83 config (:obj:`Dict[str, Any]` | :obj:`None`): Node configuration. 84 """ 85 86def__init__(self,config:Dict[str,Any]=None,**kwargs:Any)->None: 87super().__init__(config,node_path=__name__,**kwargs) 88# setup object working variables 89self.right_wrist=None 90self.direction=None 91self.num_direction_changes=0 92self.num_waves=0 93 94defrun(self,inputs:Dict[str,Any])->Dict[str,Any]:# type: ignore 95"""This node draws keypoints and count hand waves. 96 97 Args: 98 inputs (dict): Dictionary with keys 99 "img", "bboxes", "bbox_scores", "keypoints", "keypoint_scores".100101 Returns:102 outputs (dict): Empty dictionary.103 """104105# get required inputs from pipeline106img=inputs["img"]107bboxes=inputs["bboxes"]108bbox_scores=inputs["bbox_scores"]109keypoints=inputs["keypoints"]110keypoint_scores=inputs["keypoint_scores"]111112img_size=(img.shape[1],img.shape[0])# image width, height113114# get bounding box confidence score and draw it at the115# left-bottom (x1, y2) corner of the bounding box (offset by 30 pixels)116the_bbox=bboxes[0]# image only has one person117the_bbox_score=bbox_scores[0]# only one set of scores118119x1,y1,x2,y2=map_bbox_to_image_coords(the_bbox,img_size)120score_str=f"BBox {the_bbox_score:0.2f}"121cv2.putText(122img=img,123text=score_str,124org=(x1,y2-30),# offset by 30 pixels125fontFace=cv2.FONT_HERSHEY_SIMPLEX,126fontScale=1.0,127color=WHITE,128thickness=3,129)130131# hand wave detection using a simple heuristic of tracking the132# right wrist movement133the_keypoints=keypoints[0]# image only has one person134the_keypoint_scores=keypoint_scores[0]# only one set of scores135right_wrist=None136right_shoulder=None137138fori,keypointsinenumerate(the_keypoints):139keypoint_score=the_keypoint_scores[i]140141ifkeypoint_score>=THRESHOLD:142x,y=map_keypoint_to_image_coords(keypoints.tolist(),img_size)143x_y_str=f"({x}, {y})"144145ifi==KP_RIGHT_SHOULDER:146right_shoulder=keypoints147the_color=YELLOW148elifi==KP_RIGHT_WRIST:149right_wrist=keypoints150the_color=YELLOW151else:# generic keypoint152the_color=WHITE153154draw_text(img,x,y,x_y_str,the_color)155156ifright_wristisnotNoneandright_shoulderisnotNone:157# only count number of hand waves after we have gotten the158# skeletal poses for the right wrist and right shoulder159ifself.right_wristisNone:160self.right_wrist=right_wrist# first wrist data point161else:162# wait for wrist to be above shoulder to count hand wave163ifright_wrist[1]>right_shoulder[1]:164pass165else:166ifright_wrist[0]<self.right_wrist[0]:167direction="left"168else:169direction="right"170171ifself.directionisNone:172self.direction=direction# first direction data point173else:174# check if hand changes direction175ifdirection!=self.direction:176self.num_direction_changes+=1177# every two hand direction changes == one wave178ifself.num_direction_changes>=2:179self.num_waves+=1180self.num_direction_changes=0# reset direction count181182self.right_wrist=right_wrist# save last position183self.direction=direction184185wave_str=f"#waves = {self.num_waves}"186draw_text(img,20,30,wave_str,YELLOW)187188return{}
This (long) piece of code implements our custom dabble node.
It defines three helper functions to convert relative to absolute coordinates
and to draw text on-screen.
The number of hand waves is displayed at the top-left corner of the screen.
A simple heuristic is used to count the number of times the person waves his hand.
It tracks the direction in which the right wrist is moving and notes when the wrist changes
direction.
Upon encountering two direction changes, e.g., left -> right -> left, one wave is
counted.
The heuristic also waits until the right wrist has been lifted above the right
shoulder before it starts tracking hand direction and counting waves.
When working with PeekingDuck’s pipeline, you may sometimes wonder what is available in
the data pool, or whether a particular data object
has been correctly computed.
This tutorial will show you how to use a custom node to help with troubleshooting and
debugging PeekingDuck’s pipeline.
Continuing from the above tutorial, create a new dabble.debug custom node:
Terminal Session
[~user/wave_project] > peekingduck create-node
Creating new custom node…
Enter node directory relative to ~user/wave_project [src/custom_nodes]: ⏎
Select node type (input, augment, model, draw, dabble, output): dabble
Define debug.yml to receive “all” inputs from
the pipeline, as follows:
1# Mandatory configs2input:["all"]3output:["none"]45# No optional configs
Update debug.py as shown below:
Show/Hide Code for debug.py
1""" 2A custom node for debugging 3""" 4 5fromtypingimportAny,Dict 6 7frompeekingduck.pipeline.nodes.abstract_nodeimportAbstractNode 8 910classNode(AbstractNode):11"""This is a simple example of creating a custom node to help with debugging.1213 Args:14 config (:obj:`Dict[str, Any]` | :obj:`None`): Node configuration.15 """1617def__init__(self,config:Dict[str,Any]=None,**kwargs:Any)->None:18super().__init__(config,node_path=__name__,**kwargs)1920defrun(self,inputs:Dict[str,Any])->Dict[str,Any]:# type: ignore21"""A simple debugging custom node2223 Args:24 inputs (dict): "all", to view everything in data pool2526 Returns:27 outputs (dict): "none"28 """2930self.logger.info("-- debug --")31# show what is available in PeekingDuck's data pool32self.logger.info(f"input.keys={list(inputs.keys())}")33# debug specific data: bboxes34bboxes=inputs["bboxes"]35bbox_labels=inputs["bbox_labels"]36bbox_scores=inputs["bbox_scores"]37self.logger.info(f"num bboxes={len(bboxes)}")38fori,bboxinenumerate(bboxes):39label,score=bbox_labels[i],bbox_scores[i]40self.logger.info(f"bbox {i}:")41self.logger.info(f" label={label}, score={score:0.2f}")42self.logger.info(f" coords={bbox}")4344return{}# no outputs
The custom node code shows how to see what is available in PeekingDuck’s pipeline
data pool by printing the input dictionary keys.
It also demonstrates how to debug a specific data object, such as bboxes, by
printing relevant information for each item within the data.
The above is the equivalent of the tutorial Recipe 1: Object Detection Scorecustom node creation.
For more information, see peekingduck create-node --help.
PeekingDuck will read pipeline_config.yml and create the two specified custom nodes
custom_nodes.dabble.wave and custom_nodes.dabble.debug.
Your folder structure will now look like this: